Knit Horseshoe Cable Tutorial
- Phanessa Fong
- Jun 24, 2017
- 4 min read

It seems I'm constantly designing new beanies. If you are familiar with my work or follow (first, thank you!) then you will know that I'm all about the slouch beanies (mostly).
I've been digging into my stash and lately I've been obsessed with the Lion Brand's Tonal yarn. Too bad it's being discontinued! (Sobbing!)
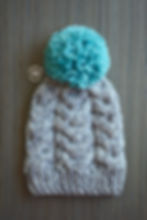
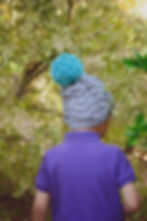
Today's tutorial is for the Horseshoe (Double Cable) Cables used in my newest design, the Parker Cabled Beanie (Pattern will be available soon). Shops can be accessed on menu bar from my Homepage. The pattern comes in sizes Baby, Toddler, Child & Adult and can be made as a fitted beanie or slouch beanie.
I've said this before but I'll say it again... cables are the reason why I was determined to learn how to knit. I'm not a huge fan of crochet cables because crochet is already thicker than knits and making cables out of crochet stitches tend to make the piece thicker than I'd like.
At first I was very intimidated with cables. Cables aren't scary. It's quite simple. All you're doing is holding a couple (or more, depending on pattern) of stitches with a cable needle while you knit the next couple of stitches first then knit the stitches on the cable needles. What this does is twist your stitches making all sorts of pretty cables.
Cable needles. You can use anything. You don't need to buy cable needles. Most people like to use double pointed needles. It doesn't necessary have to be the same size as the needles you're using either. It's a temporary stitch holder basically.
Now let's talk about the Horseshoe Cables. There are different variations of it but for this tutorial, we'll work with a 12 stitch horseshoe cable.
This horseshoe cable stitch consists of a 6 round repeat, the cable round is Cable 6 Back (C6B) and Cable 6 Front (C6F) and I'll explain that a little.
Each set of cables uses 6 stitches. That's what the "6" means in C6B or C6F. So you simply use 6 stitches to make the cables. You split the 6... usually the first 3 stitches is placed on the cable needle.
Cable 6 Back (C6B): Slip 3 stitches onto cable needle and place on BACK of work. Knit 3 stitches from knitting needles and then knit the 3 stitches from the cable needles.
Cable 6 Front (C6F): Slip 3 stitches onto cable needle and place in FRONT of work. Knit 3 stitches from knitting needles and then knit the 3 stitches from the cable needles.
When you place stitches in the back, you have a right leaning cable and when you place stitches in the front, you have a left leaning cable. Put them together, you have that "horseshoe" shape. Pay attention to the direction the cables move. This is really helpful when you start designing your own patterns.
Supplies:
Yarn
Knitting Needles (HiyaHiya's are my fav!)
Cable Needle
Stitch Markers
Working in ROWS:
Cast on in multiples of 12 stitches. You may cast on any number each side for edging. You can place stitch markers outside of the 12 stitches to help you remember where the horseshoe cable stitches start & ends. The below pattern is for the 12 stitches that make up the cables:
Row 1 (Right side): Knit all stitches
Row 2 (Wrong side): Purl all stitches
Row 3 (Cable Row): C6B, C6F.
Row 4: Purl all stitches
Row 5: Knit all stitches
Row 6: Purl all stitches
Row 7: Knit all stitches
Row 8: Purl all stitches
Repeat Rows 3-8 until desired length.
Working in the ROUND:
Cast on in multiples of 12 stitches. You may cast on any number of stitches between the cable stitches. You can place stitch markers outside of the 12 stitches to help you remember where the horseshoe cable stitches start & ends. The below pattern is for the 12 stitches that make up the cables:
Round 1-2: Knit all stitches
Round 3 (Cable Round): C6B, C6F.
Round 4-8: Knit all stitches
Repeat Rounds 3-8 until desired length.
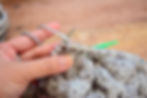
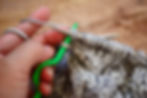
Photo Tutorial for Cable Row/Round
Cable 6 Back (C6B): Slip 3 stitches onto cable needle and place on BACK of work
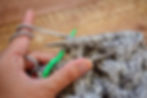
Knit 3 stitches from knitting needles
Then knit the 3 stitches from the cable needles
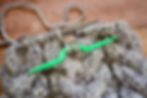
Cable 6 Front (C6F): Slip 3 stitches onto cable needle and place in FRONT of work
Knit 3 stitches from knitting needles
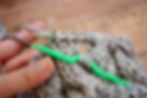
Then knit the 3 stitches from the cable needles
Video Tutorial for Cable Round
For Designs by Phanessa patterns, visit my shops from main menu.
You may sell products using ©Designs by Phanessa Patterns, but please give credit and link back to original designer & the patterns. Do NOT use any of my photos or copy/distribute any of my patterns as your own. If you share my free patterns, please link back to original pattern page. Please leave a comment if there are errors to any of my patterns. Thank you!
© 2017 Designs by Phanessa, All rights reserved.
PRIVACY and DISCLOSURE:
Designs by Phanessa is a participant in multiples affiliate programs that provides an advertising commission if you purchase through these links. If you purchase something from the affiliate links, I will get a small commission with no extra cost to you. I DO NOT collect, store, use, or share any data about you.